Contents
- 1 Key Takeaways
- 2 Meet the Example Store and Its New URL Plan
- 3 Step One: Map Every Old URL to a New Home
- 4 Step Two: Go Live and Run the 404 Checker
- 5 Step Three: Point Internal Links at Final URLs
- 6 Step Four: Keep Watch for the First Month
- 7 Conclusion
- 8 Frequently Asked Questions
- 8.1 1. How do I find all 404 errors on my WordPress website?
- 8.2 2. How can I check broken links after migrating my WordPress website?
- 8.3 3. Is there a free 404 checker or broken link checker online?
- 8.4 4. Why are my WordPress pages showing 404 errors after migration?
- 8.5 5. How do I find broken internal links in WordPress without checking every page manually?
- 8.6 6. Do I need to check external links after a website migration?
- 8.7 7. How do I fix 404 errors after a WordPress migration?
- 8.8 8. Will a 301 redirect fix all broken links after migration?
- 8.9 9. Can LinkWhisper update old internal URLs after a WordPress migration?
- 8.10 10. How often should I check for broken links on my website?
- 9 Keep learning about internal linking
Your WordPress migration is complete. But is your website still sending visitors and Google to pages that no longer exist? A redesigned website, updated permalink structure or domain change can leave behind dozens of broken URLs, missing pages and incorrect redirects. And the frustrating part? Your homepage might look perfectly fine while important landing pages and older blog posts silently return 404 errors.
This is where a reliable 404 Checker becomes essential. Instead of discovering broken URLs through declining traffic, visitor complaints or Google Search Console alerts, you can proactively check your website, identify missing destinations and investigate the links that need fixing.
In this guide, Link Whisper will walk you through how to find 404 errors after a WordPress migration, check broken internal and external links, verify redirects and restore your website’s link structure using a systematic approach.
Key Takeaways
Save a complete list of old URLs before migration. No 404 URL checker can identify a missing destination from your original website if you have not recorded or otherwise discovered that URL.
Treat 301 redirects as a safety net for visitors and search engines, then update internal links to point directly to the final URLs.
Use a WordPress broken link checker to identify inaccessible links and a separate URL validation process to test old addresses and redirects.
Run follow-up scans after launch, including a seven-day check, because some issues only surface when crawlers, visitors and external websites revisit older URLs.
Use LinkWhisper Broken Links Report and URL Changer to support ongoing WordPress link maintenance.
Meet the Example Store and Its New URL Plan
Picture an outdoor gear shop on WooCommerce with 450 products, 220 articles and a few campaign pages. The owner wants product addresses that are shorter and easier to read. The content stays the same, but nearly every product URL changes, and that combination is where broken links and slipping rankings usually begin.
Today the products live under /store/ with long names packed with model numbers. After the move, they will sit under /gear/ with short, readable names. The articles keep their own addresses, yet most of them recommend products by linking straight to the old paths.
For a shop, every dead product link has a price tag. A hiking guide that sends a reader to an error page loses the sale it was written to earn. Our page for WooCommerce shop owners covers why product links deserve this much care.
So the first job happens before any setting changes. The owner pulls every address from the XML sitemap, runs a full crawl, and saves both in a dated spreadsheet. A 404 checker can only spot what went missing if you kept a record of what was there.
Next comes a short priority list. The owner ranks pages by revenue and visits, then flags the top thirty products and eight buying guides. Those pages get checked first at every stage that follows.
Why Does Google Recommend Proper URL Mapping During Migration?
Google Search Central recommends preparing a URL mapping between the old and new website, implementing permanent redirects, updating internal links and monitoring the migration through Google Search Console.
This is important because a migration involves more than making new pages accessible. Search engines also need to understand how previously indexed URLs relate to their new destinations.
For example, if an old product page receives backlinks and organic traffic, simply deleting it without a relevant redirect can interrupt the path through which visitors and search engines discover that content.
A proper migration audit should therefore include:
Old-to-new URL mapping.
301 redirect validation.
Internal link updates.
Canonical URL verification.
XML sitemap checks.
Monitoring of missing pages and crawl errors.
Step One: Map Every Old URL to a New Home
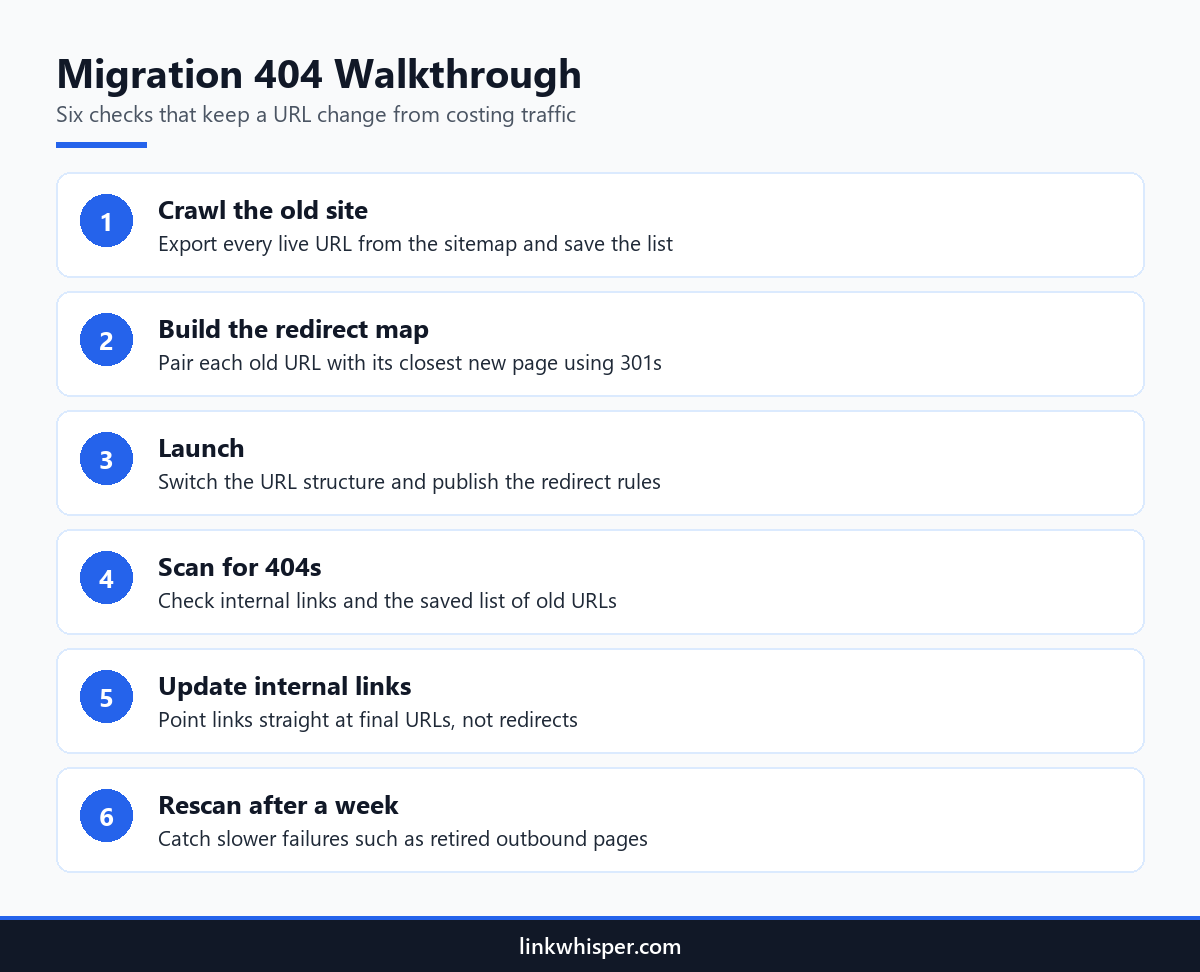
The redirect map is the backbone of the whole migration. It lists each old address next to the page that replaces it. Every row should land somewhere useful, and pages being retired should send people to the nearest relevant page, such as a parent category, instead of dumping everyone on the home page.
In the example, the spreadsheet holds 690 rows. Most products match one new page exactly. Three tents are being dropped, so their old addresses point to the tents category, where shoppers can still find a close alternative.
Each rule uses a permanent 301 status, so search engines know the change is final. Our explainer on mapping old URLs with 301s covers the basics. Google also advises a full mapping in its guide to site moves with URL changes.
An agency handling this move for a client would hand the map over as part of the job. It records what changed, when and why, which settles questions later. Our page for agencies managing client websites shows how teams keep link work repeatable across accounts.
Before launch, the owner scans the Free Internal Link Map for chains. A rule that lands on another redirect adds a wasted hop to every request. Each row must finish on a live page in one step, and pages that earn links from other sites get a second look.
Step Two: Go Live and Run the 404 Checker
Problems that hid during testing show up on launch day. A typo in one redirect rule, a menu that still uses the old path or a sidebar widget can all send people to error pages. Scanning the moment the new structure goes live lets you repair those faults before shoppers or crawlers stumble into them.
Within the first hour, the owner runs the free Broken Link Checker across the live site. In this example it reports 38 internal links that now hit an error. Nearly all of them trace back to the header menu and two article templates still hard coded with /store/.
Then the owner feeds the saved list of old addresses into a 404 checker. Nine of them fail because their redirect rules contain spelling mistakes. Correcting nine lines takes a few minutes, while leaving them broken could drain search traffic for weeks.
These two scans answer different questions. The first asks whether links inside the site still work. The second asks whether addresses that search engines and customers already know still lead somewhere. A sound migration needs answers to both.
The two scans answer different questions:
URL validation: Does the old address return the expected response or redirect to the correct new page?
Internal link checking: Are links within your website still pointing to valid destinations?
Redirect validation: Does each old URL reach its intended final destination without unnecessary redirect chains?
You can also use a 404 error checker online to test individual URLs or smaller URL lists when investigating specific migration issues.
For larger websites, a systematic crawl combined with a dedicated URL validation process provides a more complete picture than checking a handful of pages manually.
Each repair goes into a simple log next to the error it fixed. When a similar fault appears later, the log points straight at the rule or template to inspect.
Step Three: Point Internal Links at Final URLs
Redirects keep visitors moving, but they only cover the gap. Each internal link that runs through a redirect adds a small wait and creates one more rule that could fail in the future. The tidy fix is to rewrite internal links so they lead directly to the new addresses, then scan the whole site once more.
Link Whisper is a WordPress plugin, and its URL changer suits this job. The owner enters each old address and its replacement, and every matching link updates in one click. Hundreds of article links now reach /gear/ pages directly instead of hopping through a redirect.
Seven days after launch, the owner runs the 404 checker again. This pass finds a different kind of failure. A gear brand removed a product page, so two outbound links in a review now fail. Travel bloggers meet the same issue when tour operators and hotels quietly delete pages they once linked.
Last, the owner checks the fresh crawl against the original spreadsheet. Every old address now resolves to a live page. No internal link lands on an error, and every product still receives at least one internal link.
Direct links also make reports easier to trust. Click data and link counts match the real destination pages, since no redirect sits in between.
Step Four: Keep Watch for the First Month
Launch week is not the finish line. Search engines revisit pages at their own pace, other websites update their links slowly, and a small theme edit can restore an old path without warning. A light routine of weekly scans through the first month catches issues that only surface once normal traffic returns.
The example owner books a recurring weekly check for four weeks. Each session repeats a site crawl and a 404 checker pass on the old list, then lines the results up against the previous week. A fresh batch of errors usually has one source, such as a theme update or a changed menu.
The owner also looks for pages that lost every inbound internal link. During a big move, some links get deleted instead of updated, and good pages quietly become orphans. A product nobody links to is hard to reach, even when its address works perfectly.
Customers often find a dead end before any report does. So the owner adds links to the main gear categories on the custom error page, giving anyone who lands there a quick route back to shopping.
Once the month is over, the checks drop to a monthly rhythm. The site has settled by then, and new issues appear at the normal speed of publishing.
Conclusion
A URL change does not have to leave your WordPress website full of broken destinations. The key is to validate every stage of the migration rather than assuming that a working homepage means everything has moved successfully.
Save the old addresses, map every URL to its relevant destination, configure permanent redirects and run a 404 Checker immediately after launch. Then identify broken internal links, update them to their final destinations, and check external links that may have become unavailable.
For WordPress users, LinkWhisper adds another layer of practical link management. Its Broken Links Report helps identify inaccessible links, while the URL Changer makes it easier to replace outdated internal URLs across website content.
Start with a post-migration URL audit, then use LinkWhisper to maintain your internal linking structure as your website grows. A consistent checking routine helps protect navigation, content discoverability and the value of your existing website pages.
Frequently Asked Questions
1. How do I find all 404 errors on my WordPress website?
To find 404 errors in WordPress, start by exporting your website URLs from the XML sitemap or a website crawl. Use a 404 Checker to test those URLs and identify pages returning an HTTP 404 response. Compare the results against your redirect map to identify missing or incorrectly redirected destinations.
2. How can I check broken links after migrating my WordPress website?
Use a broken link checker for WordPress to scan your website content and identify internal and external links pointing to unavailable destinations. Then use a URL validation process to check old addresses and confirm that the correct 301 redirects are working.
3. Is there a free 404 checker or broken link checker online?
Yes. You can find a free broken link checker and other online URL-checking tools for basic website audits. A broken link checker online can help identify inaccessible destinations, while a dedicated WordPress solution can provide more convenient link management across your website. Check scan limits and supported features before choosing a tool.
4. Why are my WordPress pages showing 404 errors after migration?
WordPress migration 404 errors commonly occur because of changed permalink structures, missing redirects, incorrect URL mapping or outdated internal links. Sometimes the homepage works while individual posts and product pages fail because rewrite rules or permalink settings have not been updated correctly.
5. How do I find broken internal links in WordPress without checking every page manually?
A WordPress broken link checker can scan your website content and identify links pointing to inaccessible destinations. LinkWhisper’s Broken Links Report helps you review broken links from your WordPress dashboard, making it easier to investigate problems without manually opening every article.
6. Do I need to check external links after a website migration?
Yes. External destinations may not change during your migration, but the websites you link to can remove or relocate their pages at any time. Check broken external links regularly, particularly on affiliate pages, product reviews and resource articles.
7. How do I fix 404 errors after a WordPress migration?
To understand how to fix 404 errors after migration, start by checking the old URL against the new website structure. Add relevant 301 redirects, correct permalink settings, update outdated internal links and restore accidentally deleted pages where necessary. Run another URL scan after making the corrections.
8. Will a 301 redirect fix all broken links after migration?
No. A 301 redirect helps visitors reach a new destination when an old URL has moved permanently. However, internal links may still point to the old address. Update those links to their final URLs rather than depending entirely on redirects.
9. Can LinkWhisper update old internal URLs after a WordPress migration?
Yes. LinkWhisper’s automatic link building tool lets you replace matching old URLs with their new destinations across WordPress content. This can save considerable editing time when hundreds of posts contain links to outdated product pages, articles or website paths. Remember to configure server-level redirects separately.
10. How often should I check for broken links on my website?
Run a comprehensive scan immediately after migration, followed by another check around seven days later. During the first month, weekly scans can help identify emerging issues. After that, monthly checks are a sensible maintenance routine for many WordPress websites.
Link Whisper tips
Keep learning about internal linking
Get Link Whisper tips and offers in your inbox.
Check if your site has the same issues.
Run a free audit right now. See your orphaned pages, broken links, and link health score in 60 seconds.
Check My Site