Contents
You can think of an XML sitemap as your website’s roadmap. It’s what search engine crawlers follow to find and index the important pages of your site. A sitemap audit is an important part of SEO because it ensures that all of the correct URLs are included in the XML sitemap.
Google has an in-depth explainer about sitemaps if you’re interested in learning more.
What is an XML Sitemap?
The point of an XML sitemap is for search engines to understand the content and structure of your website. It crawls and indexes important pages so that it can show them to people who are searching for the information your site provides.
You may not need an XML sitemap (but you probably have one anyway).
Typically, an XML sitemap and a sitemap audit are only important for large websites. If you have a small website, you may not have to worry about this just yet. (However, it’s likely you still have a sitemap since WordPress creates them automatically.)
On a large website, incorrect URLs in the sitemap can have a negative impact on the crawl budget.
A crawl budget is how many pages a search engine will crawl within a certain timeframe. If a web crawler wastes time on incorrect URLs, it may not be able to get to the correct URLs, which means they won’t get indexed.
There’s an exception, though. If you have a small website without any backlinks, a sitemap will help search engine crawlers find and index your site. Otherwise, since no other sites are pointing to it, it could get missed completely.
Only important URLs should be part of a sitemap.
Not every single URL on your website needs to be part of your sitemap. Only the URLs that you want search engines to crawl and index should be included.
Pages to include in your sitemap:
- Pages that you want to rank for in search results.
- Pages that search engines may have a hard time finding.
You don’t need to include under-construction pages, non-canonical URLs, and other unimportant or duplicate pages.
How to Audit an XML Sitemap
When performing a sitemap audit, the XML sitemap should only have URLs with a 200 OK status code. You can read about status codes here.
Find the Website’s XML Sitemap
To perform a sitemap audit, you’ll want to find and review the XML sitemap for your website. There are a few go-to places to check first.
1. Add one of the following common sitemap locations to the end of your homepage URL:
- /sitemap.xml
- /sitemap_index.xml
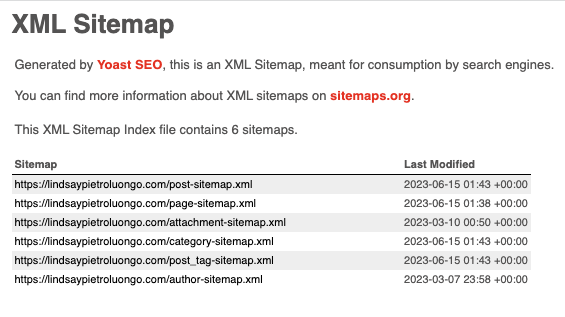
- /sitemap/
For example, when I enter lindsaypietroluongo.com/sitemap.xml or lindsaypietroluongo.com/sitemap_index.xml, I see my sitemap.
2. If none of the above work, try a few less-common sitemap locations:
- /sitemap.php
- /sitemap.txt
- /sitemap.xml.gz
3. Add /robots.txt to the end of the URL. The sitemap URL should be one of the last lines.
For example, when I go to lindsaypietroluongo.com/robots.txt, this is what I see:

I could then go to that URL to find my sitemap. You may also find our how to find a sitemap article useful.
Use Google Search Console to Check the XML Sitemap
When performing a sitemap audit, you should always check the Google Search Console (GSC) Sitemaps report. This report will tell you the following:
- If Google has received a submission of the XML sitemap.
- If there are any problems with fetching your XML sitemap.
- Any indexing issues with submitted URLs.
This is an important step of a sitemap audit because it tells you how well the XML sitemap is performing and if there are any problems that need attention. Here’s how to check your sitemaps in GSC:
1. Go to Google Search Console and log in.
2. Click Sitemaps in the left sidebar and select an entry under Submitted sitemaps.
3. Select one of the sitemaps indexed by Google.

4. Click Open Sitemap in the top-right corner.

Now you’ll see the sitemap, and you can review it.

Address Issues that GSC Found
Aside from reviewing your XML sitemap as part of your sitemap audit, you can also review issues that Google found when trying to crawl your site.
1. Go to GSC, click Sitemaps in the left sidebar, then click one of your submitted sitemaps.
2. Select See Page Indexing toward the top.

3. Uncheck the green Indexed box so that only the gray Not indexed box is selected.

4. Scroll down to the Why pages aren’t indexed section and click on a Reason to find out more.

Now you can look into the problem more and troubleshoot if necessary. For example, when I select Duplicate, Google chose different canonical than user, this is what I see:

I can now research this URL to determine if Google’s indexing the correct URL or not. If not, I’ll take the steps necessary to fix it and have it reflected on my XML sitemap.
Use SEO Spider for Website Crawling and a Sitemap Audit

Aside from GSC, you can use the SEO Spider tool from Screaming Frog (or another similar tool) to crawl the website and XML sitemap or the sitemap only. This helps you find orphan URLs, meaning URLs that are in the sitemap but are not internally linked on the website. It also shows you URLs that were discovered in the crawl but are not included in the sitemap.
Crawl the Website and Sitemap
1. In the navigation bar at the very top, select Configuration > Spider > Crawl. This will open a pop-up box over the main Spider dashboard.

2. The Crawl option should be automatically chosen for you in the left sidebar.

In the XML Sitemaps section, check Crawl Linked XML Sitemaps and Crawl These Sitemaps, then enter the sitemap URL for your website.

3. Go back to the Spider dashboard. Enter the website URL and click Start to begin the crawl.

This will crawl the website and the XML sitemaps at the same time.
4. Click the Sitemaps tab. If you can’t find it, click the Down Arrow and uncheck tabs you don’t need at the moment. That should make the Sitemaps tab visual in that tab bar.

5. Run a post-crawl analysis. Go to Crawl Analysis > Configure and make sure Sitemaps is checked.

Next, select Crawl Analysis > Start from the top navigation bar.

When the analysis is complete, you’ll see a green box with Analysis 100% at the top of the Spider tool.

6. Review the filters on the left side of the Spider tool. The dropdown menu lets you choose from seven filters.

Here’s the data that each of them shows you to help with your sitemap audit:
- URLs in Sitemap: All of the URLs included in the sitemap.
- URLs not in Sitemap: URLs discovered in the website crawl that are not included in the sitemap. Review the URLS and, for the important ones that should be included in the sitemap, update it to include them.
- Orphan URLs: URLs included in the sitemap but not found during the crawl. You can either remove the pages from the sitemap or link to them internally on your website so they appear in the next website crawl.
- Non-indexable URLs in Sitemap: URLs that are in the sitemap but are not indexable. Either they should be removed from the sitemap, or you should fix their ability to be indexed. Yoast has a helpful article about what to do with an accidental noindex post.
- URLs in Multiple Sitemaps: URLs that appear in more than one sitemap. While this may not be a problem, if a URL shouldn’t be appearing in multiple sitemaps, you can remove the extra instances.
- XML Sitemap with over 50k URLs: This filter shows your sitemaps with over 50k URLs. According to Google, sitemaps have a size limit of 50,000 URLs or 50MB.
- XML Sitemap over 50MB: This filter shows your sitemaps with a file size of 50MB, which is above the Google sitemap limit.
Crawl the Sitemap Only
While this won’t be as comprehensive as crawling both the website and the sitemap because you won’t be able to compare the two, you will get an overview of your sitemap with this method.
This is particularly useful if you’re only after certain information, like noindex pages or pages that return a status code other than 200 OK.
For large websites, it’s helpful to get that information so those pages can be removed from the sitemap when possible. That way, the crawl budget won’t get used up so quickly.
1. From the top navigation bar, select Mode > List.

2. Click the Upload dropdown menu and select Download XML Sitemap.

3. Enter the sitemap URL in the box that appears and click OK.

4. Perform a post-crawl analysis. From the top navigation bar, select Crawl Analysis > Start. Wait until you see the green box with Analysis 100% at the top.
5. Select All in the Filters dropdown on the left side of the tool. You can then scroll through all of the links and associated information, or you can click on the headers to sort them that way. For example, if I click Indexability, the noindex pages show up first.

Non-indexable URLs should either be removed from the sitemap or updated so they can be indexed.
Go to the Overview section on the right to dig into the URLs more. For example, there’s a Canonicals dropdown menu that lets you see just your website’s canonical links.

There’s also a dropdown for Response Codes, a tab with all sorts of Issues, etc.

Dig into these different sections (and any others you want) to perform a thorough sitemap audit.
Final Thoughts About Your Sitemap Audit
Finding your sitemap and running an audit isn’t difficult, but combing through your website to figure out what to update can be time-consuming. Since your XML sitemap is what search engines use to find, index and show your content in search results, though, it’s a crucial part of website SEO.
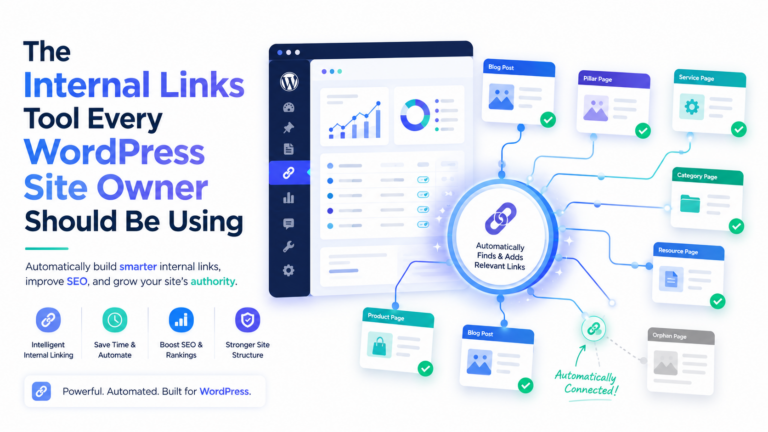
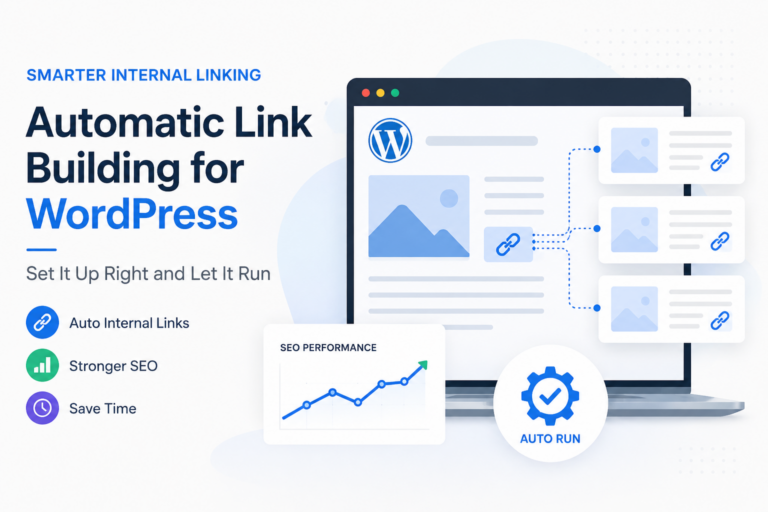
Also, keep in mind that websites with strong internal linking make it easier for Google to crawl the site and add important URLs to the sitemap. Build internal links the smart way with Link Whisper.
Check if your site has the same issues.
Run a free audit right now. See your orphaned pages, broken links, and link health score in 60 seconds.
Check My Site