
Contents
- 1 What is an auto internal link plugin?
- 2 How is auto suggest mode different from full automation mode?
- 3 How many keyword rules should I set up first?
- 4 What pages should always be on my exclusion list?
- 5 Will auto internal linking hurt my SEO if it is misconfigured?
- 6 How often should I check my internal link reports?
- 7 Can auto internal linking find orphaned pages on my site?
- 8 Is auto internal linking safe for WooCommerce stores?
- 9 How many internal links should one blog post have?
- 10 Do I need a plugin for internal linking, or can I do it manually?
Looking An auto internal link setup only pays off when you configure it before your next post goes live, not after. Most WordPress site owners install a linking plugin, leave every setting on default, and then wonder why the suggestions look random or thin. This guide walks through the real setup process: connecting Link Whisper, building keyword rules tied to your priority pages, excluding the URLs that should never receive an automatic link, and choosing between auto suggest and full automation mode based on the size and structure of your site. Do this before you publish another post, not after you notice your rankings have already stalled.
Key Takeaways
- Auto internal linking only performs well when keyword rules, exclusion lists, and anchor text variation are configured on purpose, never left on default settings.
- Auto suggest mode fits smaller sites that want manual review of every link. Full automation mode fits sites with 100 or more pages that need linking at scale.
- Run an internal link audit and check for orphaned pages before your next post publishes, not weeks after traffic has already stalled and you are left guessing why.
Why Default Settings Break Your Internal Linking
A plugin installed on default settings will still suggest links, but it will suggest the wrong ones. Without keyword rules, the tool guesses at relevance using whatever anchor text happens to match a page title. Looking into exclusion lists, it happily links to your privacy policy, your tag archives, and half finished draft pages nobody meant to publish yet. Additionally, anchor variation, every link into your best performing post uses the exact same three words, which reads as manipulative to both readers and search engines over time.
The result is a site full of broken internal links, thin anchor text, and pages that never receive the link equity they need to rank. Google has been clear that internal links are one of the strongest signals it uses to understand which pages on a site actually matter, and a poorly configured auto linking plugin undermines that signal instead of strengthening it, according to Google Search Central documentation on link best practices. When a crawler cannot tell which pages you consider important, it treats them all as equally minor, and that flattens your entire site structure.
This is the gap most setup guides skip. They show you how to activate a plugin, not how to configure it so it survives contact with a real site that has categories, seasonal content, an archive of old posts, and a checkout flow that changes weekly. A generic activation walkthrough will get a plugin running in five minutes. It will not tell you which settings actually determine whether your links help rankings or quietly damage them.
If you are still choosing between tools, start with a look at what actually makes a strong internal link plugin, then come back here to configure it properly before you publish anything else. Configuration, not installation, is where most sites lose the benefit they were hoping to gain.
Step One: Install Link Whisper and Run Your First Site Scan
Install Link Whisper from your WordPress dashboard and activate it like any other plugin. Once active, run the initial site scan before touching any other setting. This builds the index Link Whisper uses to suggest links, mapping every post, page, and product against the keywords it finds across your existing content.
The scan is also your first real audit, and it is worth treating it that way rather than clicking through it quickly. It will surface pages with zero inbound internal links, often called orphaned pages, and it will flag anchor text patterns already in use across your site, including any that repeat too often. Do not skip reviewing this report line by line. It tells you exactly where your internal linking for WordPress is thin before you turn on any automation that could make existing problems worse instead of better.
For larger catalogs, run the free internal link checker first to get a baseline broken link count before you change anything. Comparing that baseline against your post launch numbers a few weeks later is the clearest proof the setup actually worked, and it gives you a concrete number to report back to a client, a manager, or your own future self.
This first scan typically takes a few minutes on a small blog and considerably longer on a large publisher site with thousands of posts. Let it finish completely before moving to keyword rules. Rules built against an incomplete index will miss pages that had not been scanned yet, and you will end up rebuilding rules you thought were already correct.
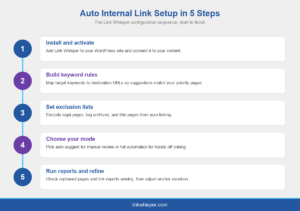
Infographic showing the five step auto internal link setup flow in Link Whisper
Step Two: Build Keyword Rules That Match Real Search Intent
Keyword rules are the core of any auto internal link setup, and they deserve more attention than any other setting in the plugin. Each rule maps a phrase, or a small set of phrase variations, to one destination URL. When Link Whisper scans new or existing content, it looks for those phrases and suggests a link to the mapped page instead of guessing based on loose title matching.
Build rules around your priority pages first, not every page on the site at once. Assign three to five target phrases per page, written the way a reader would naturally phrase them in a sentence, not stiff exact match keywords stuffed awkwardly into copy. A page about anchor text optimization for internal links should have rules built around phrases people actually type into search boxes, which also keeps your internal linking for SEO aligned with real query data rather than assumptions made at a desk.
Store owners should not skip this step or treat it as optional. WooCommerce catalogs change constantly as products go in and out of stock, and keyword rules keep category and product pages linked correctly even as inventory shifts week to week. Without rules, a plugin left to guess will happily link an old, discontinued product page just as confidently as your current bestseller.
Search Engine Journal has noted that internal links placed in logical, contextually relevant spots do more for both users and rankings than links added purely for keyword density, and keyword rules are what keep that placement accurate instead of accidental. Review your rule list monthly. New content changes what counts as your priority pages, and rules written six months ago rarely reflect what matters to your site today.
Step Three: Exclusion Lists and Anchor Text Variation
Exclusion lists stop the plugin from linking pages that should never receive an automatic internal link in the first place. Legal pages, tag archives, author archives, thank you pages, and thin or outdated posts all belong on this list. Add them once, during setup, rather than discovering the problem after cleaning up bad links that have already gone live across twenty different posts.
Anchor text variation matters just as much as exclusions, and it is the setting most guides mention only in passing. Set four to six anchor phrase variants for every mapped URL rather than relying on one phrase repeated everywhere. Repeating the exact same anchor text across dozens of posts looks unnatural to readers and can flag a page for over optimization in search engines. Reasonable, deliberate coverage of internal link anchor text keeps the pattern natural while still reinforcing what the destination page is actually about.
Set a link cap per post as well, so a single article does not end up with thirty auto inserted links crowding out the content itself. There is a real, researched answer to how many internal links per page makes sense, and it is rarely more than a small handful per one thousand words of content. Once rules, exclusions, variation, and caps are all set, pull up the internal link map to see the actual structure you just built before you move on to choosing an automation mode. Seeing the map visually often reveals gaps that numbers alone do not show.
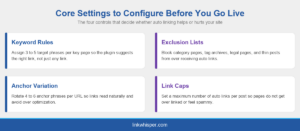
Infographic listing the four core settings for auto internal link setup: keyword rules, exclusion lists, anchor variation, and link caps
Step Four: Auto Suggest vs Full Automation, Choosing the Right Mode
Link Whisper offers two distinct ways to apply the rules you just built. Auto suggest mode surfaces link recommendations inside the editor as you write or edit a post, and you approve each one individually before it goes live on the page. Full automation mode applies matching links automatically the moment you save or publish a post, with no manual review step required from you at all.
Auto suggest is the safer starting point for smaller sites, new bloggers, and anyone still refining their keyword rules for the first time. It keeps a human in the loop, which matters most in the first few weeks after setup, while rules are still being tested against real content. Full automation earns its place on larger sites, the kind SEO agencies manage for clients with 100 or more pages, where reviewing every single suggestion manually simply is not realistic given the volume of content being published.
Neither mode is inherently better than the other. The right choice depends on site size, team capacity, and how much you genuinely trust your exclusion lists at this point in the process. Agencies running multiple client sites often start every new site on auto suggest for the first month, then graduate it to full automation once the rules have proven themselves through several weeks of consistent, accurate review.
It also helps to see how Link Whisper’s approach compares to the alternatives before committing to either mode long term. Site owners weighing options often compare it directly against Internal Link Juicer, against Yoast’s built in linking suggestions, or against Rank Math’s AI Link Genius feature, since each tool handles rules, exclusions, and automation differently under the hood, and the gap shows up most in how much manual cleanup each one requires later.
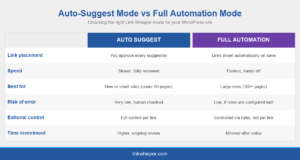
Infographic comparing Link Whisper auto suggest mode and full automation mode side by side
Step Five: Test, Monitor, and Refine Before Your Next Post
Setup is not finished once automation is switched on. Pull up the internal link analytics and reporting dashboard weekly for at least the first month after launch. Watch for pages that still show zero inbound links, anchor text that repeats too often despite your variation settings, and any rule that is quietly suggesting links to the wrong page entirely.
Refine keyword rules as new content gets published, rather than treating the rule set as something you finish once. A rule that worked cleanly for five posts can start misfiring once you publish a sixth post that happens to share vocabulary with an unrelated page elsewhere on the site. Treat the rule set as a living document that grows with your content calendar, not a one time setup task you complete and never revisit again.
If ongoing management is not realistic in house, done for you linking services exist precisely for this reason, handling rule maintenance and recurring audits so the system does not quietly drift out of accuracy over months of new publishing. Either path works, in house or managed, as long as someone is actually checking the reports.
Do not schedule your next blog post until this system has been checked at least once. A single unreviewed automation pass can quietly attach the wrong anchor text to your highest value page, and that mistake can sit there undetected for weeks before anyone notices the drop in relevant traffic.
Conclusion
Auto internal linking done right is not a plugin you switch on once and forget about. It is keyword rules mapped to real, priority pages, exclusion lists that protect the pages that should never get an automatic link, anchor variation that keeps every link reading naturally, and a mode choice that actually matches the size and pace of your site. Get this configured properly before your next post publishes, not after you notice rankings have quietly stalled. Link Whisper handles the mechanics once you have made these decisions deliberately instead of leaving them on default. Set up in 10 minutes, get Link Whisper, and stop guessing at your internal link structure post after post.
Frequently Asked Questions
How is auto suggest mode different from full automation mode?
Auto suggest shows link recommendations inside the editor for you to approve one by one. Full automation inserts matching links the moment you save or publish, with no manual review step, which suits larger sites managing content at scale.
How many keyword rules should I set up first?
Start with three to five keyword rules per priority page rather than covering your entire site at once. Expand gradually as you confirm each rule is suggesting the correct destination URL and not misfiring on unrelated content.
What pages should always be on my exclusion list?
Legal pages, tag and author archives, thank you pages, and thin or outdated posts should always sit on your exclusion list. Adding them during initial setup prevents cleanup work later once links have already gone live.
Will auto internal linking hurt my SEO if it is misconfigured?
Yes, a misconfigured setup can quietly hurt rankings by linking irrelevant pages or repeating identical anchor text everywhere. Running a dedicated dead link checker alongside your internal link reports catches broken destinations before they affect real organic traffic.
How often should I check my internal link reports?
Check your internal link reports weekly for the first month after setup, then move to a biweekly or monthly cadence once your keyword rules and exclusion lists have proven stable across several publishing cycles and content types.
Can auto internal linking find orphaned pages on my site?
Yes, a full site scan flags orphaned pages, meaning posts and pages with zero inbound internal links, so you can build keyword rules that connect them to relevant content instead of leaving them undiscovered by readers or Google.
Is auto internal linking safe for WooCommerce stores?
Yes, when configured with WooCommerce specific exclusion lists and keyword rules mapped to current products and categories. Store owners should review rules monthly since product availability changes far more often than typical blog content does.
How many internal links should one blog post have?
There is no fixed number, but most well linked posts include several internal links per one thousand words of content, distributed naturally across the introduction, body sections, and conclusion rather than clustered together in one single paragraph.
Do I need a plugin for internal linking, or can I do it manually?
You can add internal links manually, but it is slow and inconsistent on any site beyond a handful of pages. Visit the knowledge base for manual linking guidance, or use auto internal linking to apply rules consistently at scale.
Check if your site has the same issues.
Run a free audit right now. See your orphaned pages, broken links, and link health score in 60 seconds.
Check My Site