Link Whisper Premium now has a built-in MCP connection! This lets you connect an AI app like ChatGPT or Claude to Link Whisper and ask it about your site’s links in plain English.
You can ask it to find orphaned posts, check broken links, or suggest links to a page you want to promote. It gets the information from Link Whisper on your site, and any links it proposes wait for you to review and add.
For your first MCP connection, we recommend using Copy setup message in Step 2 and letting your AI walk you through it.
Here’s what you need and how to get connected.
What you need
- Link Whisper Premium 4.0.6 or newer. Update Link Whisper first if you’re on an older version.
- Your site connected to Link Whisper AI. Go to Link Whisper > AI Subscription and click Sign in to LinkWhisper.com if you haven’t connected it yet. You’ll need AI credits for paid tasks.
- An AI app that supports remote MCP connections. This guide covers ChatGPT, Claude, Claude Code, Cursor and VS Code. Your AI account or workspace must allow you to add a custom connection.
Step 1: Turn on AI Agent Access
- In WordPress, go to Link Whisper > Settings.
- Open the AI tab and find AI Agent Access (MCP).
- Turn on Enable AI Agent Access (MCP). This setting saves automatically.
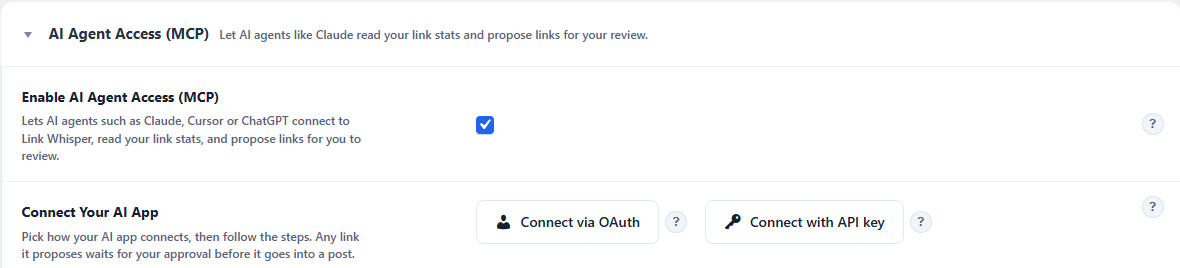
Turn on AI Agent Access, then choose how to connect your app.
The Connect Your AI App section gives you two options. Choose OAuth to sign in from your AI app (ChatGPT or Claude), or API key if your app needs a key.
Step 2: Connect your AI app
Recommended for your first MCP connection
If you’ve never connected an app with MCP, start with Copy setup message and let your AI walk you through it.
- Under Connect Your AI App in Link Whisper, click Copy setup message.
- Paste the copied message into a chat with the AI app you want to connect.
- Follow its instructions to connect Link Whisper, then continue to Step 3 below to check the connection.
The message includes your site’s connection information and asks your AI to guide you through getting setup, one step at a time.

Copy this message into your AI chat and let it walk you through connecting.
If you’re familiar with connecting MCPs, you can follow the manual setup steps below.
Option 1: Connect with OAuth
OAuth lets you sign in to your WordPress site and approve the connection. Primarily, this is meant for ChatGPT and Claude access.
- Click Connect via OAuth in Link Whisper.
- Click Copy to copy your connection address.
- Follow the steps for your app below.
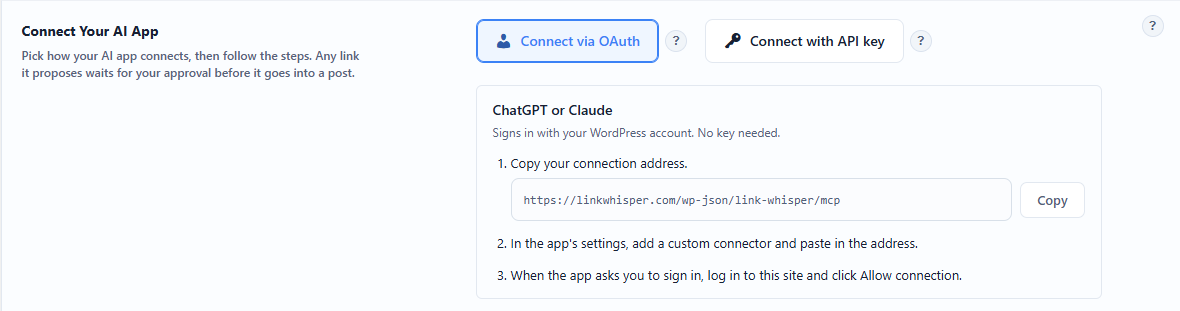
Choose Connect via OAuth and copy your own site’s connection address.
ChatGPT
- Open Plugins in ChatGPT, click the + button, then choose Add custom MCP server.
- Name it Link Whisper and add a short description, such as “Internal linking reports and suggestions for my website.
- Enter your connection address as the MCP server URL and choose OAuth authentication. Use automatic client registration if asked.
- Review the connection warning, confirm you want to continue, and click Create as a plugin.
- Complete the WordPress sign-in and approval when prompted, then install the plugin. In a new chat, type @ and select it.
These are ChatGPT’s current menu names. If your account looks different, follow OpenAI’s connection guide.
Claude
- Open Customize > Connectors, click + Add, then Add custom connector.
- Name it Link Whisper, paste your connection address, and click Continue.
- Keep sign-in enabled. Under OAuth client, choose Use Claude’s published identity (Recommended) instead of Register automatically.
- Finish adding the connector and sign in when prompted. If you see a Connect button beside it, click that to start sign-in.
- In your chat, open + > Connectors and enable Link Whisper.
On a managed Claude workspace, an owner may need to add the connector first. See Claude’s connection guide for account-specific steps.
Approve the connection in WordPress
When your app sends you to your site, log in to WordPress if needed. Check the app name and permissions on the Connect to Link Whisper screen, then click Allow connection. You’ll return to your AI app to finish connecting.
Option 2: Connect with an API key
Use this option for apps such as Claude Code, Cursor or VS Code.
- Click Connect with API key in Link Whisper.
- Copy your connection address.
- Click Generate key, then copy the key. It’s only shown once.
- Add the address and key to your app using one of the examples below.
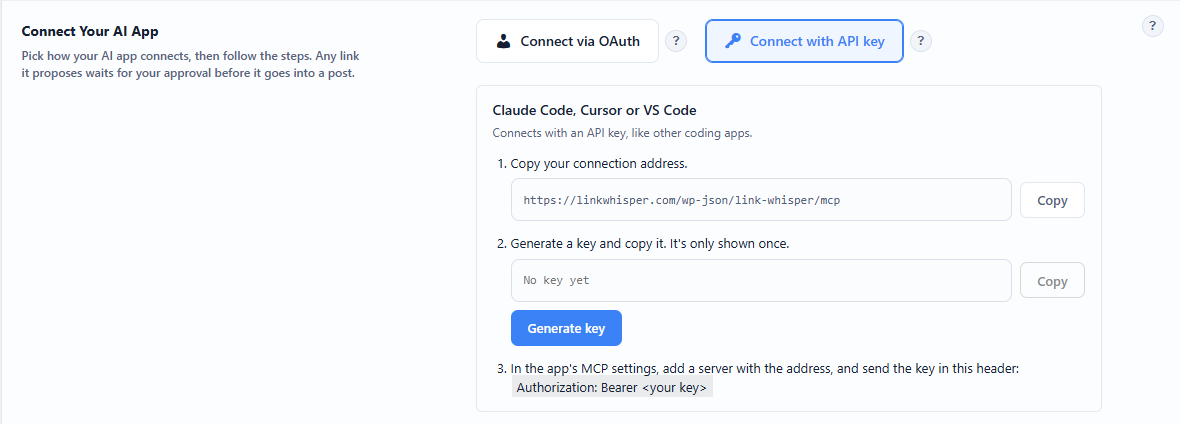
Copy your connection address, then generate an API key for your app.
In the examples below, replace https://yoursite.com/wp-json/link-whisper/mcp with your copied address and YOUR_KEY with your generated key. This is a Link Whisper MCP key, separate from an AI provider’s API key or any sort of license key and should be kept secret.
Claude Code
Run this in your terminal:
claude mcp add --transport http link-whisper https://yoursite.com/wp-json/link-whisper/mcp --header "Authorization: Bearer YOUR_KEY"Open Claude Code and use /mcp to check the connection. See the Claude Code MCP guide for more setup options.
Cursor
Add this server to your personal ~/.cursor/mcp.json file. If the file already has servers, add Link Whisper alongside them.
{
  "mcpServers": {
    "link-whisper": {
      "url": "https://yoursite.com/wp-json/link-whisper/mcp",
      "headers": {
        "Authorization": "Bearer YOUR_KEY"
      }
    }
  }
}
Save the file and enable the server in Cursor’s MCP settings. See Cursor’s MCP guide if needed.
VS Code
For VS Code’s workspace MCP configuration, add this to .vscode/mcp.json:
{
  "servers": {
    "link-whisper": {
      "type": "http",
      "url": "https://yoursite.com/wp-json/link-whisper/mcp",
      "headers": {
        "Authorization": "Bearer YOUR_KEY"
      }
    }
  }
}
Save the file, start the server, and accept the trust prompt if shown. Use a chat mode that can call MCP tools. VS Code supports several configuration locations; see its MCP configuration guide if your setup uses a different one.
Keep your key private. It connects as the admin who generated it. Don’t share it in a chat or commit a configuration file containing it to a shared repository. Generating a new key replaces your old one.
Step 3: Check that you’re connected
Start a new chat with Link Whisper enabled and ask:
Check my Link Whisper AI credit balance.
Checking your credit balance is always free. If your AI returns the balance, the connection is working!
About credits: Reports and content reads use Link Whisper AI credits unless you have an active Link Whisper AI subscription, which makes those reads free. Generating suggestions, running AI fixes and submitting proposals still use credits. Ask “What will this task cost in Link Whisper AI credits?” before a larger job. Your AI app may have its own charges too.
Basic things to ask your AI
You don’t need special commands. Tell your AI what you’d like it to check.
| What you want to do | What to ask |
|---|---|
| Get an overview | “Use Link Whisper to check my site’s internal linking. What should I work on first?” |
| Find orphaned posts | “Show me five posts with no inbound internal links.” |
| Check broken links | “List the first ten broken links and the pages they’re on.” |
| Check one page | Show me the inbound and outbound internal links for [page URL].” |
| Find inbound links | “Find relevant places in my other posts to link to [page URL].” |
| Find outbound links | “Suggest relevant internal links I could add inside [page URL].” |
Replace [page URL] with a page on your site. For an inbound link, another page links to this page. An outbound link goes from this page to another one.
A good first linking task
Start with one post you’d like to get more internal links to. Paste its URL into this message:
Use Link Whisper to find up to five relevant inbound link opportunities for [page URL]. Read the surrounding text and explain why each link would help a reader. Ask me before starting work that uses credits.
After you’ve looked at the suggestions, follow up with:
Submit the three best links as proposals for me to review in Link Whisper.
Then open your Link Whisper Dashboard and look for Agent Proposals Waiting for Review. Click Review proposals, check the sentences and anchors, and add the links you want. You can also reach them through Review agent proposals in the connection settings.
Proposed links wait for review. Your AI can also change supported settings, target keywords, money pages and some report options when you ask. Those changes take effect directly, so be specific about what you want changed.
Need help connecting?
If the connection still doesn’t work:
- Your app can’t reach the site: check that AI Agent Access is enabled and that your host or security plugin isn’t blocking the connection. Cloud apps need to reach your site over the internet.
- Sign-in fails: check HTTPS and pretty permalinks, and follow any warning in Link Whisper’s OAuth panel.
- The key is refused: check the copied key and the
Authorization: Bearer YOUR_KEYheader. If you generated a replacement key, update your app. - The app connects but paid tools won’t run: check your Link Whisper AI connection and credit balance under AI Subscription.
To disconnect an app, go back to these settings and click Revoke connection for OAuth or Revoke key for an API key.